

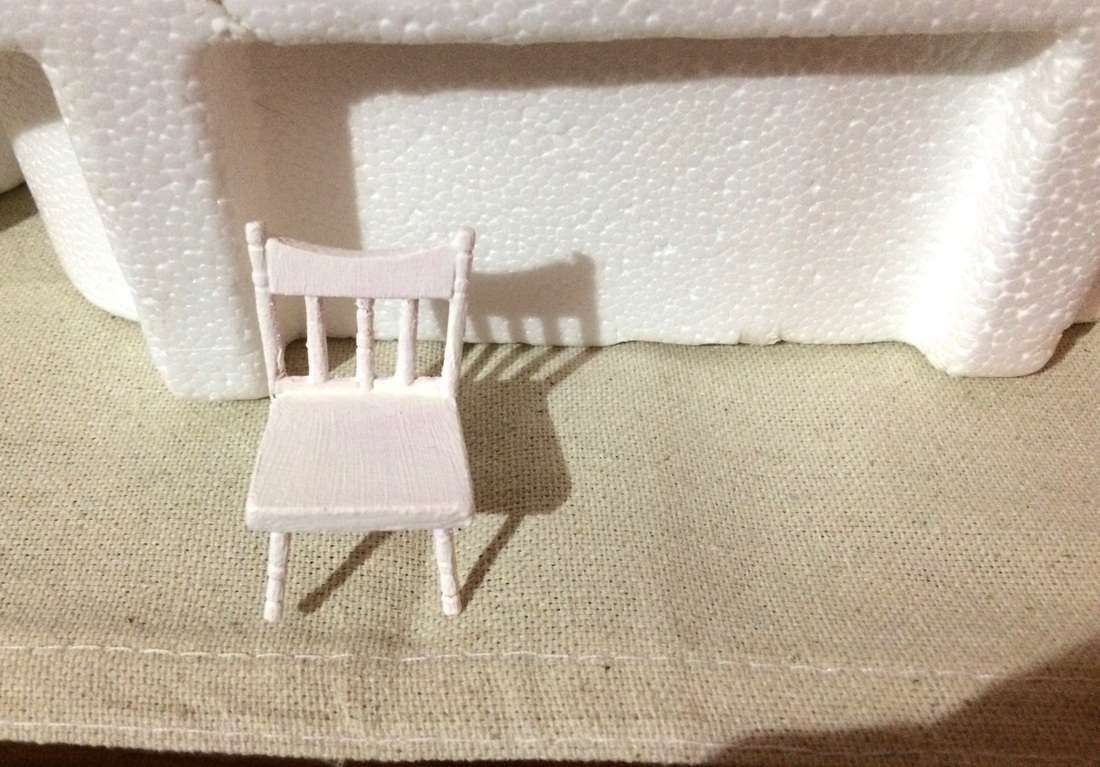
I made a chair a while ago from cardboard and toothpicks, but didn't post a tutorial. So today I want to share a new chair I made for a project I'm working on (tutorial to come!) It's made completely of wood.
Materials:
Paint stick - The stuff you get at The Home Depot to stir paint
Round Toothpicks - Preferably with decorative ends
Wood glue - Hot glue *will* work, but it will be messy and not so neat looking.
Utility Knife - Something to roughly shape your paint stick
Sandpaper - A Dremel would make life a lot easier if have one
This was another unplanned project, so I don't really have a picture of the materials. Apologies.
Instructions:
Step 1: Sketch out the design of your seat on the paint stick.
Step 2: Cut out a rough shape of your seat. Just discovered I don't have a picture for this. Ugh. Basically all you have to do is cut out a square around your paint stick. Score both sides of the paint stick with your utility knife, the snap it along the line.
Step 3: Shape your seat. Use a sandpaper to finish our the sides of the seat. I originally went for a curved design, but later settled on a more simplistic design. The curved design is still there in some of the earlier photos, before I decided to go with the later design.

Step 4: Attach the toothpicks to the back of the seat. You'll want one toothpick one each side and a toothpick down the middle. I later corrected the abnormal amount of slant the back of the chair had.
Also note that I was using hot glue at this point because it dries quickly, and I don't want to be holding toothpicks in place for however long it take for wood glue to dry. Later I would reinforce with wood glue and scrape away excess hot glue.
The top section is cut from the curved part of the paint stick (I suppose that's where you hold it), and sanded to fit the gap between the toothpicks.
The two bars at the bottom are from flat toothpicks I had on hand and initially put there to hide the hot glue mess holding the toothpicks to the seat. I like it though.


Step 5: Next, you're going to want to put in the legs. I marked, then carved out small holes where I wanted the legs to go. Then I used a small flat screwdriver to bore out fairly deep holes.
Give the legs some slant, and try to keep them as even in length as possible. If your chair is wiggling/rocking after putting all four legs in, you can use the sandpaper to wear the offending leg down and make them even.
I know in the pictures I use hot glue, but I advise you against it. Use wood glue. I later took out all the legs and re-glued them with wood glue and they are super sturdy.


Step 6: Lastly, add in the bars in the back of the seat. I used the non-decorative part of the round toothpicks for this. They should be a perfect fit, and use wood glue to secure them.

Give it a coat of acrylic paint, or keep the original wood look. It's up to you!
Happy Crafting,
Erin A
 RSS Feed
