
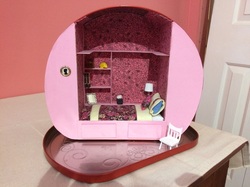
So I finally made a miniature room based on the one I shared with you 3 years ago (here).
I can't believe it's been so long, I know I promised you guys a tutorial "soon" back then; its been in the back of my mind and I've finally finished. Tell me your feedback in the comments (or shoot me an email at [email protected]).
It's going to be a long and somewhat complicated tutorial; I finished the structure in 2 or 3 days, most of accessories I had on hand, but I waited two weeks to pick out matching scraps for the bed. So all in all if I hadn't procrastinated it might've only taken me a week or less.
(edit: I got this tutorial ready a month ago but was missing a few pictures and got lazy. Sorry. :)
Part 1: The Structure
Materials:
A Box - I used a chocolate tin.
Paperboard - Cereal boxes. An easy way to store cereal boxes is to flatten them and slip them into a drawer. They don't take up much space and they're good for lots of things.
Glue Stick and School Glue - These should not be used interchangeably. The glue stick is for paper/card stock to prevent wrinkling and the school glue is for gluing down fabric.
Fabric - (optional) For use as a wallpaper.
Card Stock
Scissors
Pen - For marking things

This is a very incomplete picture of the materials I used. I was kind of making this "spur of the moment" so I collected materials as I used them. At least you can see the type of box/tin I used though.
Instructions:
I hardly know how to begin. Here we go!
Step 1: The first thing we are going to do is set up the walls on both sides in the front. Trace and cut out the size that you want.

You can see how it will sit in the picture below. Don't glue just yet.

Step 2: The next thing is the inside walls. Cut it to the right width/height depending on the size of your box.

Complete on the other side as well.

Step 3: Glue both pieces to a piece of card stock. This will make it easier to glue down since you can handle it as one piece instead of two.

Make sure you leave enough space for folding like shown below.

Step 4: This is optional, but I added a strip of paper on the inside of the fold to make sure the two ends wouldn't open up.

Step 5: Glue the two sides in place.

Another angle.

Step 6: Cut another strip of paper board. Mines was about 1.5 inches. This will be the front.

Step 7: I had to put the phone to charge so I wasn't able to take a few pictures. You haven't missed much; I'll explain what you have to my best ability :)
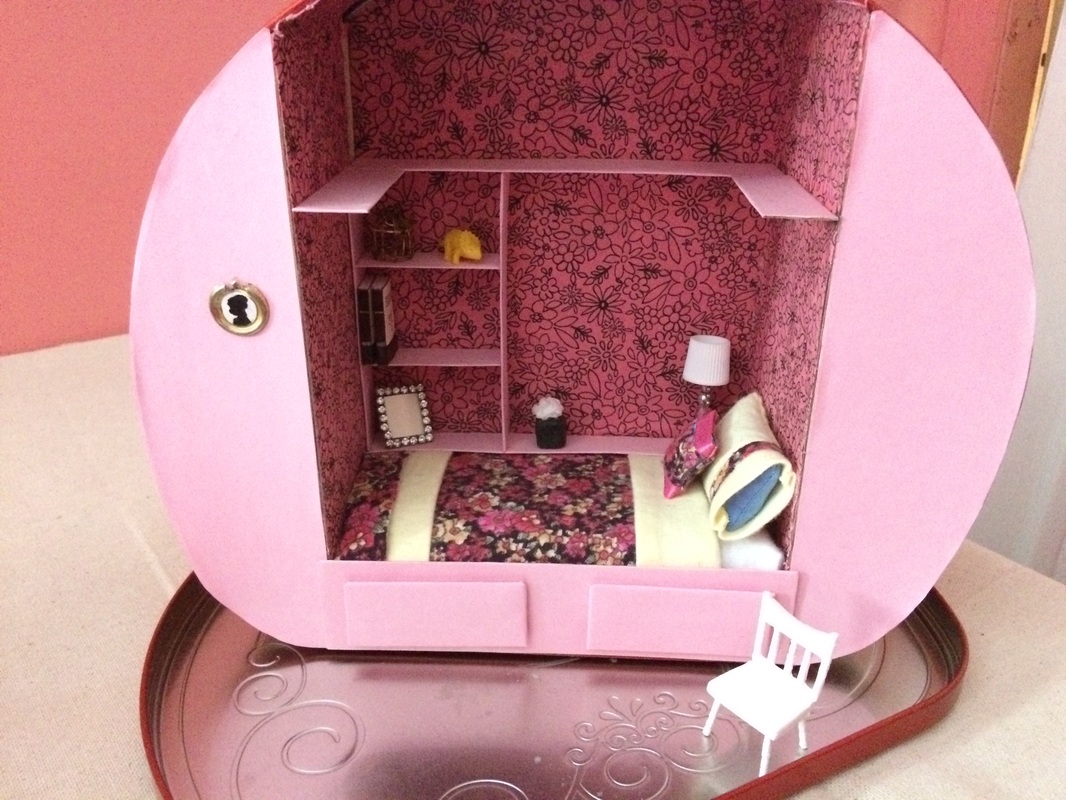
I covered the outside walls and front with pick paper.
I also cut out two rectangles as "drawers". These were initially fake but then I decided to make them real drawers. You'll see how in the next step.
I added the end of a paperboard box as a place for the bed mattress to rest. As you can tell, it sits lower than the front; this is so when I place the mattress in, the mattress will line up with the front edge. It's hard to explain. You'll see.

This is an inside view of the front. I had to cut holes to accommodate the drawers. You can use matchboxes for the drawers and glue on the paperboard rectangles on the front, or make your own as I did. Make sure you cut the holes for the both drawers even otherwise they will look wonky. :)

Another view from the front with the drawers open.

I would later recover the entire outside with another layer of pink paper and also glue fabric to the insides.
So, that wasn't too hard! The terminology/wording is a little hard but I hope the pictures help explain everything clearly! We're on the decorations!
Part 2: The Decorations
Instructions:
Step 1: Make a mattress. I made mine by wrapping a piece of foam I had around and wrapped it in white fabric. Nothing fancy, I taped the bottom to make it stay in place.

Step 2: Next we're going to make the shelves. Cut strips of paperboard that are all the same width in the following sizes.
You will need:
- 2 the same length as the sides
- 2 the same length as the back wall
- 2 (long) the same length as each other (the sides of the "bookshelf")
- 2 (short) the same length as each other (the shelves of the "bookshelf")
Cover them in colored paper.
I'm missing a few in the top picture. The bottom picture has all of them except the sides. Dunno what I was thinking.


Step 2: I made the bedsheets using scraps of fabric.


You can find my tutorial for pillows here: Pillows
I actually tried something new this time, where I made the pillow using the above tutorial, but made a pillowcase separate, using the same method, except with no filling and leaving one side open. That way I can change the pillow covers, which takes up less space and time than making new pillows. Also more realistic.
The decorative pillow was made in the standard way of making the pillow. I.e., no pillow cover.


I don't really like the way the sheets look in this bedroom; they don't really match, so I'm thinking of changing the sheets. Will update you if I do :)
Step 3: Time to decorate!
Chair: My tutorial here: chair


Lamp: My Tutorial here: lamp (my original lamp fell apart so I made a sturdier one later, it just happened to match the color scheme :)


Hanging Frame: My tutorial here: hanging frame (in fact I made that 3 years ago for this project. It's a surprise I still have it :)

Bird Cage: I made the bird cage a while ago; but didn't post a tutorial, unfortunately. It's made from wire, and the door opens and closes.


Frame: The frame is a belt buckle. I used a piece of card stock as a "picture" until I can find a suitable picture. I used a piece of wire to make a little contraption for it stand on it's own.


The mini rhino figurine is from my attempts to find a suitable size container for my Beauty and the Beast project. In case you were wondering, the container it came in was too small so I didn't end up using it.

So that's it! Hope you like it, and don't forget to leave me comments or send me an email!


Happy Crafting!
-Erin A
 RSS Feed
